Wednesday, February 27, 2013
Tuesday, February 26, 2013
Tutorial on Portrait
First off, take a portrait of yourself in Photobooth. Open the image in Photoshop, convert it to black and white and up the contrast and brightness.
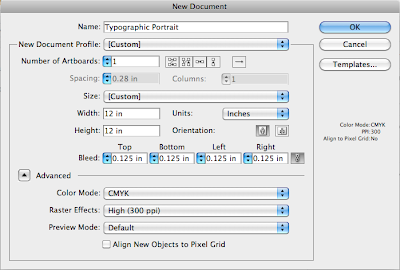 In Illustrator, set up a new document at 12 x 12 inches. GO TO: File > New, and this is what your window will look like. Click advanced and make sure your Color Mode is CMYK, Raster Effect is High 300, and your Preview is Default.
Make sure your Layers window is open. GO TO: Windows > Layers.
Immediately open a new layer in this new document. Into this new layer (layer 2), you will drag your portrait.
Scale the image to fit in your canvas. Note, your image will become pixelated. Don't worry. You will delete this image/layer once your typo portrait is finished.
Click and drag Layer 2 to be under Layer 1. Double-click on Layer 2 and check the Lock and Template box in the Layer Options window. Now select Layer One.
Select the type tool (it resembles the one from Photoshop). Click the area on your image where you want the text to go and start typing. You can change the size and scale of your text. Use more text to create the illusion of darkness and less text to create the illusion of lightness.
Lesson 7 in your books will help you reshape and warp text or to create text paths.
Once you are finished adding text, delete Layer 2, the layer that contains the original photographic portrait.
Monday, February 18, 2013
Assignment #4 Typographic Portrait
Assignment #4 Typographic Portrait
Program: Illustrator CS5
Imagery Tools: TEXT, TEXT, and more TEXT
Create a self portrait in Illustrator using text. You can use ANY font/typeface, but you must ONLY use that font/typeface. You may change the color, font size, orientation... etc.
Step One: Take a photo of yourself RIGHT NOW using Photobooth. Use it as your guide for creating your portrait. There should be NO trace of this image in your final typographic portrait. The image should be 12 x 12 inches.
Step Two: Utilize text to create a typographic portrait. It can be ANY text you choose -- letters, numbers, symbols... etc. Play around with font sizes, color, rotations, warps... etc.
Step Three: PRINT!
The finished product must be on 13" x 19" paper at 300 dpi (resolution). You will be printing this image! You can use the Digital Print Lab here in the Art Dept or another print source of your choice. It MUST be printed on photographic grade paper! NOTE your portrait will be 12 x 12, but printed on 13 x 19 paper!
Due date: MONDAY, MARCH 18. - Come to class with your finished print! And upload your final image to your blogger as well as your Photobooth portrait (for comparison)!
A Shout-out To: The Class Website
Have you guys checked out the class' Weebly site???? I'm posting your new media assignments as well as your curatorial projects. So ya mammas and daddys and significant others can see the fruits of your labors.
http://newmediautsa.weebly.com/
It's rad.
http://newmediautsa.weebly.com/
It's rad.
Wednesday, February 6, 2013
Sherry Turkle: The Tethered Self
Here's a link to Sherry Turkle's The Tethered Self. It's a great article about how technology has taken over our everyday lives -- sometimes for the better, sometimes for the worst. It's a great read! Ruben would definitely like it.
http://newmediautsa.weebly.com/uploads/3/6/0/2/3602870/turkle.pdf
http://newmediautsa.weebly.com/uploads/3/6/0/2/3602870/turkle.pdf
Tuesday, February 5, 2013
Assignment #3 Curatorial Project
Assignment #3 Curatorial Project on New Media Artists
All research to be posted onto your WEEBLY accounts.
Here are the following pages that must be present:
Home - An image of your main artist or the artist's work.
Artists - A list of artists including the artist I assigned you as well as two similar artists that you've found while researching, with brief descriptions of each (5 sentences each).
Portfolio - Images of your artists' work, or documentations of their work/performance/video. Five images per artist.
Curatorial Statement - A brief statement (500 words) on your three artists and how their work or methods are similar. How do they connect visually or conceptually?
References - A list of all links, books, magazines, articles... etc... that you used while researching and putting together this site.
Due date: Monday, Feb 25
Listed below are the student-artist pairs:
Kat - Nam June Paik
Moriah - William Kentridge
David - Bill Viola
Rosa - Martha Rosler
Samantha - Joseph Beuys
Ray - Paul Chan
Daryl - Harun Farocki
Fernanda - Carolee Schneemann
Jason - Bruce Nauman
Kayla - Dan Graham
Ruben - Dennis Oppenheim
Fabian - VIto Acconci
Assignment #2
Assignment #2 Scanography
Program: Photoshop CS6
Imagery: Scanned Imagery
Create a composition in Photoshop using scanned objects. You can use ANY scanned object!!* You must use at least 7 different scanned elements.
With this project, you will learn edits for photographic images, transparent layering, and overlaying.
The finished product must be 13" x 19" at 300 dpi (resolution). You will be printing this image! You can use the Digital Print Lab here in the Art Dept or another print source of your choice. It MUST be printed on photographic grade paper!
The finished product must be 13" x 19" at 300 dpi (resolution). You will be printing this image! You can use the Digital Print Lab here in the Art Dept or another print source of your choice. It MUST be printed on photographic grade paper!
Due date: Wednesday, Feb 20. - Come to class with your finished print! And upload your final image to your blogger!
Technical References:
Classroom in a Book: Adobe Photoshop CS6 Chapter 5
* Do not scan dirt, liquid, sand... etc... Avoid things that will get the scanner dirty or potentially break it.
* Do not scan dirt, liquid, sand... etc... Avoid things that will get the scanner dirty or potentially break it.
Subscribe to:
Comments (Atom)