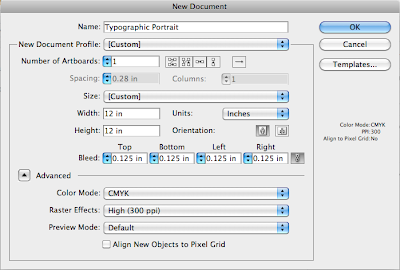
 In Illustrator, set up a new document at 12 x 12 inches. GO TO: File > New, and this is what your window will look like. Click advanced and make sure your Color Mode is CMYK, Raster Effect is High 300, and your Preview is Default.
Make sure your Layers window is open. GO TO: Windows > Layers.
Immediately open a new layer in this new document. Into this new layer (layer 2), you will drag your portrait.
Scale the image to fit in your canvas. Note, your image will become pixelated. Don't worry. You will delete this image/layer once your typo portrait is finished.
Click and drag Layer 2 to be under Layer 1. Double-click on Layer 2 and check the Lock and Template box in the Layer Options window. Now select Layer One.
Select the type tool (it resembles the one from Photoshop). Click the area on your image where you want the text to go and start typing. You can change the size and scale of your text. Use more text to create the illusion of darkness and less text to create the illusion of lightness.
Lesson 7 in your books will help you reshape and warp text or to create text paths.
Once you are finished adding text, delete Layer 2, the layer that contains the original photographic portrait.
No comments:
Post a Comment